The -recurse switch does not work properly on Remove-Item. Better to use Get-Childitem.
Get-ChildItem -Path C:\TestFolder -Exclude SubFolder1,SubFolder2 | Remove-Item -Recurse -Force
insidetech…"
The -recurse switch does not work properly on Remove-Item. Better to use Get-Childitem.
Get-ChildItem -Path C:\TestFolder -Exclude SubFolder1,SubFolder2 | Remove-Item -Recurse -Force
Here’s the PowerShell command:
Get-ADUser <UserName> -Properties whenCreated | Format-List Name,whenCreated

or
Get-ADUser -Filter * -Properties * | Select Name, whenCreated, whenChanged, LastlogonDate
In the Active Directory
Go to account properties > Attribute Editor > check for “whenCreated” attribute.

In this guide, I’ll show you how to get the password expiration date for Active Directory User Accounts.
This is very easy to do.
I will provide a few examples that go over how to get this information for a single user and how to get the expiration date for all AD users.
Check it out.
This first method uses the net user command that is built into windows. This command is used to add, remove and make changes to user and computer accounts.
To determine when the password will expire for a single account open the command prompt and type the following command:
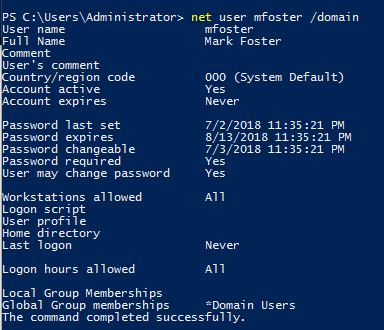
Net user USERNAME /domain
In the below screenshot is an example for the user mfoster.
In addition to displaying the password expires date it also provides other useful information such as password last set, when the password can be changed, if the account is active and so on.
That is it for method 1.
Continue reading “How to Get AD Users Password Expiration Date”
By default SMB version 1.0 is enabled in Windows 10. As this was last needed in Windows XP and Windows Server 2003 it’s quite old, newer versions of SMB are more secure and have additional features. If you no longer need to support these older versions of SMB file shares, it’s a good idea to disable SMB version 1.0, or even remove it completely, as a number of recent vulnerabilities specifically affect SMB version 1.
Windows XP was the last client supported version of Windows to only use SMB version 1, now that it’s no longer supported Microsoft are planning on shipping Windows with SMB 1 disabled by default in the future. It’s currently enabled by default for compatibility reasons with these older operating systems, however when we’re in a world where SMB 1 does not need to be supported it will not be used.
Just recently in March 2017 Microsoft patched a remote code execution vulnerability in SMBv1. By having SMB v1 disabled, these sorts of vulnerabilities will not be a problem for you.
The ETERNALBLUE SMBv1 exploit is actively being used in the wild to distribute the WannaCry ransomware. See here for further information specific to WannaCry.
Before disabling or removing SMB v1, it’s worth checking if our network is actively using it, as turning it off could cause problems if it’s actually required.
We can audit SMB v1.0 traffic in our network to see if it’s still being used by running the following PowerShell cmdlet.
Set-SmbServerConfiguration –AuditSmb1Access $true
We can view this log by running the following PowerShell cmdlet.
Get-WinEvent -LogName Microsoft-Windows-SMBServer/Audit
You can also open event viewer and browse to Applications and Services > Microsoft > Windows > SMBServer > Audit. This is a good way of determining whether SMB 1 is still in use within your network before disabling it.
Realistically as long as you have no Windows XP or Windows Server 2003 systems or older running on your network, this should not cause any problems as Windows should negotiate SMB version 2 or 3.
SMB can be disabled both on the “server” and client side. We’ll first start off by showing you how to disable SMB version 1.0 on the server side. In Windows 10, the server side would be if your Windows 10 system is offering SMB file shares over the network, while the client side is the system connecting to the share.
Open PowerShell with administrative privileges. If we run the ‘Get-SmbServerConfiguration’ cmdlet, we can see that by default EnableSMB1Protocol is set to True, as shown below.
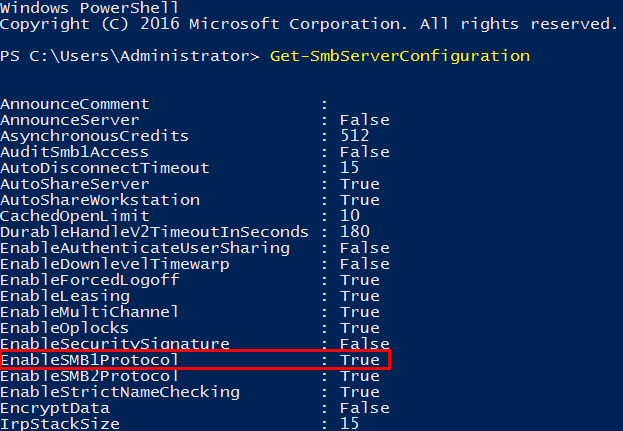
Note that if you set AuditSmb1Access as shown previously that this value also shows in this output.
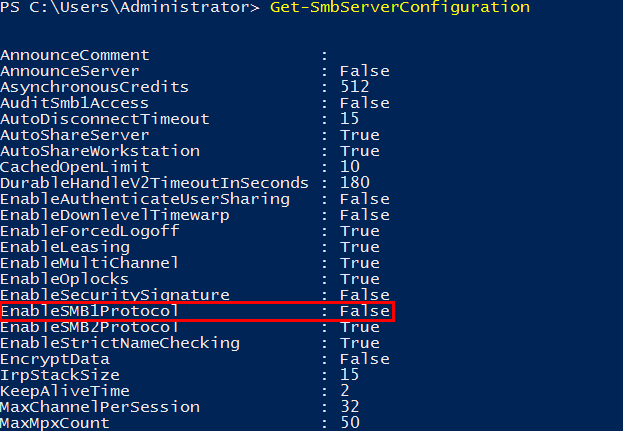
We can change this with the ‘Set-SmbServerConfiguration -EnableSMB1Protocol $false -Force’ cmdlet, as shown below.
![]()
We add -Force on the end otherwise we get prompted for confirmation, this allows us to simply run one command with no input required.
Now if we run the ‘Get-SmbServerConfiguration’ cmdlet again, we can see that EnableSMB1Protocol is now showing as False.
We can go a step further, and instead remove SMB version 1 from Windows 10 to prevent it from serving SMB shares over version 1 with the following PowerShell cmdlet.
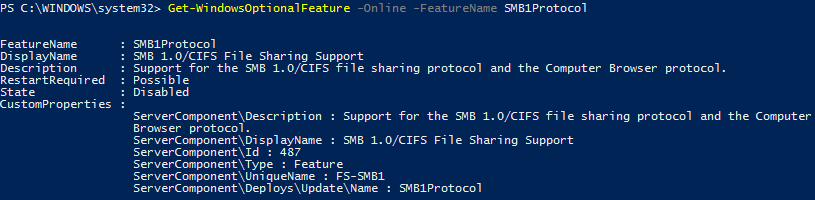
Disable-WindowsOptionalFeature -Online -FeatureName SMB1Protocol -Remove
This will require a reboot to complete. Afterwards you can run ‘Get-WindowsOptionalFeature -Online’ and confirm that SMB1Protocol shows as disabled.
This is a good step to do after you’ve had SMB 1.0 disabled for a while and are sure it’s not required. Completely removing it reduces the attack surface further and frees disk space.
By disabling the server side configuration as shown above, our Windows 10 system will no longer offer SMB v1 shares. The SMB client however is still able to attempt to connect to an external SMB v1 share on another server, unless we also disable the SMB v1 client. This is done by running the following commands in either PowerShell or Command Prompt with administrative privileges.
sc.exe config lanmanworkstation depend= bowser/mrxsmb20/nsi
sc.exe config mrxsmb10 start= disabled

With these steps you have now seen how to disable SMB version 1.0 in Windows 10 on both the server and client side using Windows PowerShell. This can help secure your Windows system as SMB v1 is considered an older protocol with many known vulnerabilities that have been discovered recently.
Simple method:
Import-Module ActiveDirectory
Get-ADUser -Filter * -Properties * | export-csv c:\ADusers.csv
Method 2
This is a simple Powershell script that will export the Display Name, Email Address and Title of all users inside Active Directory to a CSV file. You first must install the Active Directory Module for PowerShell.
This was tested on Server 2008 R2 Standard server.

To install the AD Powershell module, on a Windows Server 2008 R2 server, open an elevated Powershell console window and run the following commands:
PS C:\> import-module servermanager
PS C:\> Add-WindowsFeature -Name “RSAT-AD-PowerShell” -IncludeAllSubFeature

This step is optional but in order to keep things tidy, create a new folder on the server. For example C:\Scripts
NOTE: The PowerShell script created in Step 3, export’s the CSV file to the C:\Scripts folder.

Copy the following powershell command into the notepad:
Get-ADUser -Filter * -Properties DisplayName, EmailAddress, Title | select DisplayName, EmailAddress, Title | Export-CSV “C:\Scripts\Email_Addresses.csv”
Save the file as “EmailAddresses.ps1” into the C:\Scripts folder on the server.
NOTE: If you wish to export the CSV file to a different destination, edit the Export-CSV “C:\New Destination\Email_Addresses.csv”

Start -> All Programs -> Accessories -> Windows PowerShell -> Right Click on Windows PowerShell and select ‘Run As Administrator’

Enter the following command into the PowerShell window:
import-module activedirectory

Enter the following command into the PowerShell window:
cd c:\scripts
NOTE: If you saved the PowerShell script to a different destination you must browse to that destination in the step.

Enter the following command into the PowerShell window:
.\EmailAddresses.ps1

You should now have a CSV called “Email_Addresses.csv” in your C:\Scripts folder

If you just wish to view the results in PowerShell and not export to a CSV file, simply open an elevated PowerShell window and run the following:
import-module activedirectory
Get-ADUser -Filter * -Properties DisplayName, EmailAddress, Title | select DisplayName, EmailAddress, Title
You can replace the -Filter * with the following to narrow down your results to a single user account:
Get-ADUser -identity %username% -Properties DisplayName, EmailAddress, Title | select DisplayName, EmailAddress, Title
